


How to Sign a Dotloop Document: A Simple Step-by-Step Guide for Clients
Receiving an email request to sign a document can feel urgent, especially when it's for a major transaction like buying or selling a home. If your real estate agent uses Dotloop, you'll find the process is designed to be straightforward. This guide will walk you through exactly how to sign a Dotloop document, whether you're on a computer or your phone, ensuring you can complete the task quickly and securely without any confusion.
We'll cover the entire process from opening the email to the final confirmation click. You'll learn what to expect, how to troubleshoot common issues, and understand why this platform is a staple in the real estate industry. By the end, you'll be able to handle any Dotloop document signing with confidence.
Quick Summary
- No Account Needed: As a client, you do not need to create a Dotloop account to sign documents. You only need access to the email address where the request was sent.
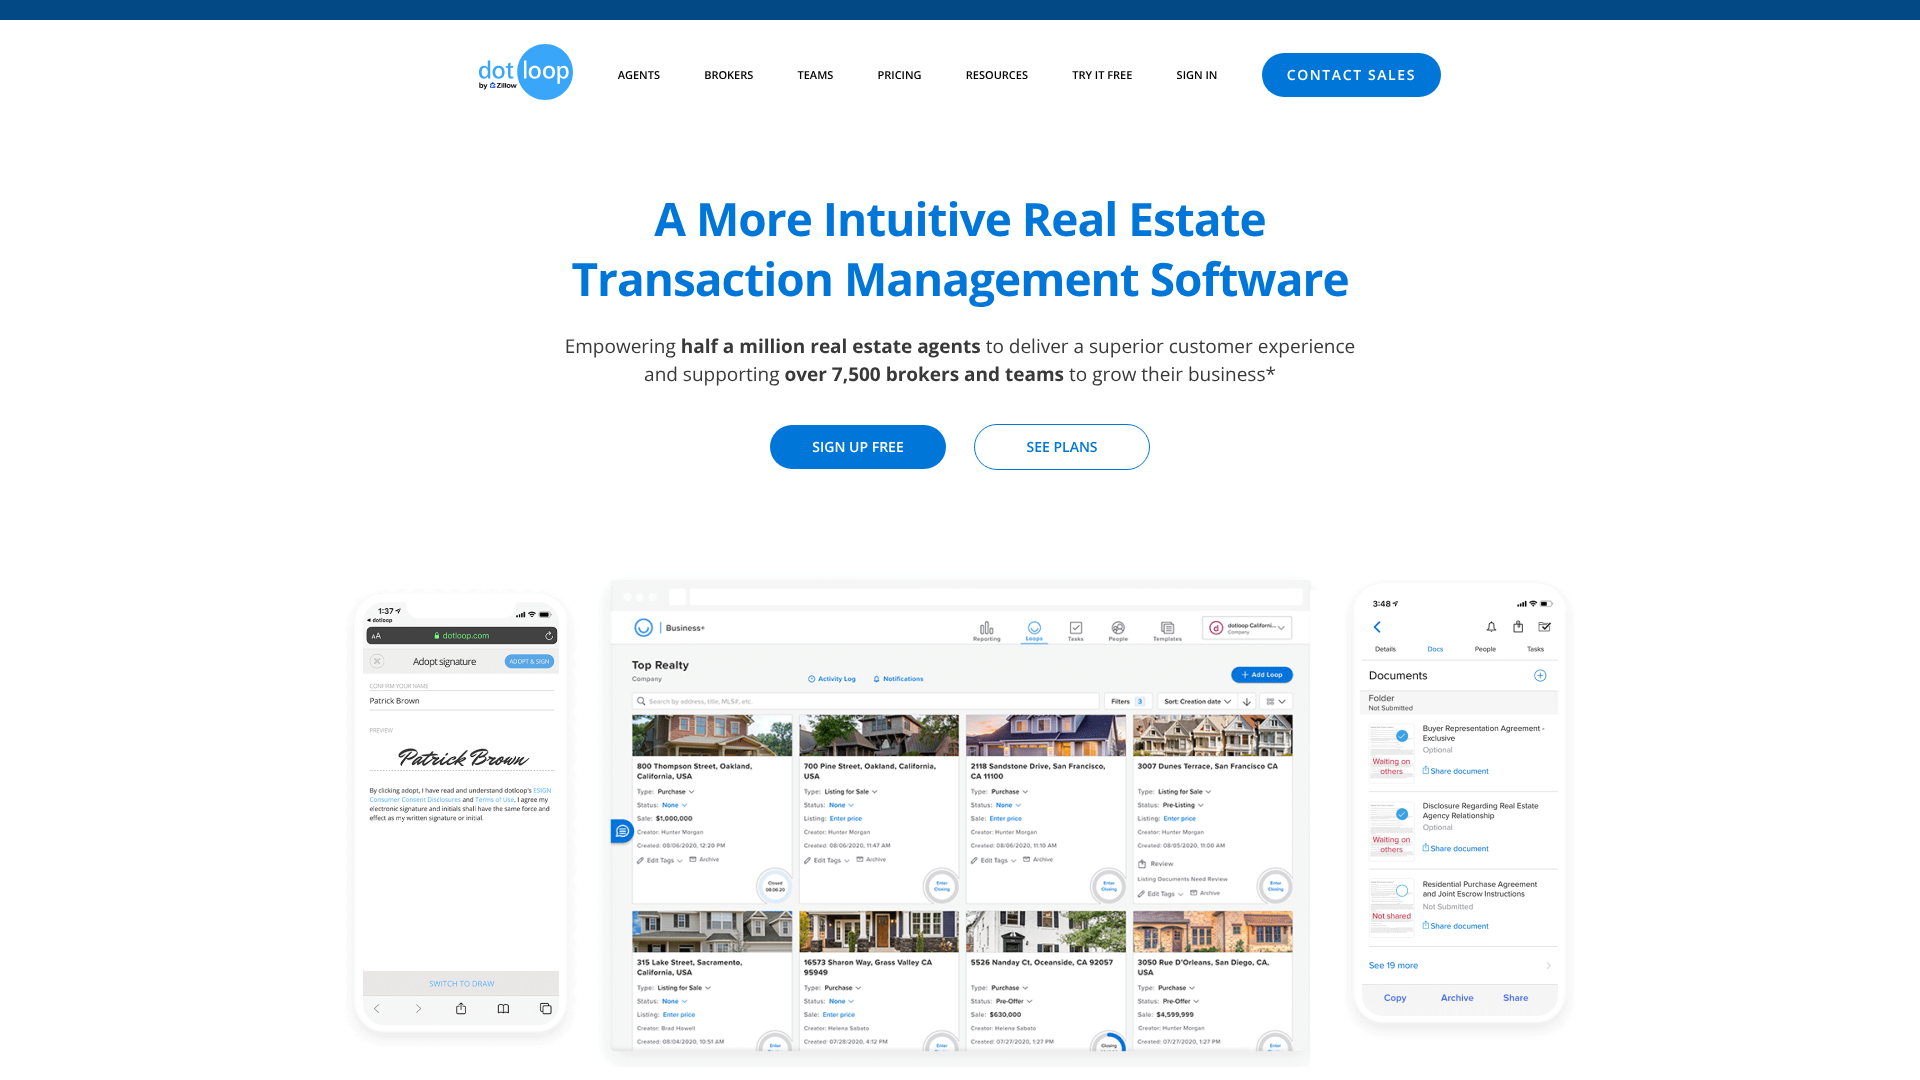
- Start with the Email: The process always begins with an email from your agent with the subject line "ACTION NEEDED." Click the "VIEW DOCUMENT" button inside to get started.
- Follow the Prompts: Once inside the document, click the flashing blue "START SIGNING" button. Dotloop will automatically guide you to every field that requires your signature or initials.
- Adopt and Sign: The first time you click a signature field, you'll be asked to confirm your name and initials. Click "Adopt and Sign" to create your electronic signature for the document.
- Finish to Save: After all fields are complete, you must click the "FINISH SIGNING" button. This is a critical step that saves your signatures and notifies your agent that the documents are complete.
What is Dotloop and Why Is It Used for Document Signing?
Dotloop is a real estate transaction management software designed to streamline the entire process of buying and selling property. At its core, it's a collaborative platform where real estate agents, clients, brokers, and other parties can manage, share, and sign documents in one centralized online location, known as a "loop."
In the past, real estate transactions involved mountains of paperwork, requiring in-person meetings, faxes, and overnight shipping to get signatures. This was slow, inefficient, and prone to errors. Dotloop was created to solve this problem by digitizing the entire workflow. Its primary function is to enable legally binding electronic signatures (eSignatures), which have the same legal standing as a handwritten signature in the United States, thanks to the Electronic Signatures in Global and National Commerce (ESIGN) Act of 2000.
Agents use Dotloop because it integrates everything they need into one system. They can create offer letters from templates, share disclosures with clients, track progress, and ensure all paperwork is compliant and stored securely. For you, the client, it means you can review and sign important documents from anywhere, at any time, using your computer, tablet, or smartphone. This convenience is a major reason why the dotloop document signing process has become so popular in the industry.
Key Features of Dotloop's eSignature Platform

While the client experience is focused on simplicity, the platform itself is built with powerful features that ensure security, compliance, and efficiency for real estate professionals. Understanding these features can give you confidence in the process.
Legally Binding eSignatures
Every signature captured through Dotloop is legally binding. The platform complies with the federal ESIGN Act and the Uniform Electronic Transactions Act (UETA), which provide the legal framework for electronic signatures in the U.S. This ensures that your signed contracts are just as enforceable as if they were signed with pen and paper.


Complete Audit Trail
One of the most critical security features is the detailed audit trail. Dotloop records every action taken on a document within a loop. This includes who viewed it, when they viewed it, when they signed, and the IP address from which they signed. This comprehensive log, called a Certificate of Authenticity, provides a verifiable history of the document's lifecycle, which is crucial for legal and compliance purposes.
Bank-Grade Security
Dotloop uses advanced encryption to protect your personal information and transaction details. Data is encrypted both in transit (as it moves across the internet) and at rest (when it's stored on their servers). This is the same level of security used by major financial institutions, protecting sensitive information like your name, address, and financial details from unauthorized access.
Mobile Accessibility
Flexibility is key in today's fast-paced world. Dotloop's platform is fully responsive, meaning you can complete the dotloop document signing process on any device. Whether you're using an iPhone, an Android device, or a tablet, the interface adapts to your screen size, making it easy to read and sign on the go. This eliminates delays and helps keep your transaction moving forward.
How to Sign a Dotloop Document as a Client
The most common way you'll interact with Dotloop is as a client receiving a request to sign. The system is designed to be intuitive, guiding you through each step. Here’s a detailed breakdown of the process for both desktop and mobile users.
Step-by-Step Guide for Desktop Users
Signing on a computer is the most common method. You just need a web browser and access to your email.
-
Open the Email Request: Look for an email from your agent via Dotloop. The subject line will typically be "ACTION NEEDED – [Your Agent's Name] has shared a document with you." Open this email.
-
Click 'View Document': Inside the email, you'll see a large blue button that says "VIEW DOCUMENT." Click this button. It will open the document in a new tab in your web browser. You do not need to log in or create an account.
-
Start the Signing Process: Once the document loads, you'll see a flashing blue button in the upper-right corner that says "START SIGNING." Click this to begin. Dotloop will automatically scroll you to the first field that needs your attention.
-
Adopt Your Signature: Click on the first signature or initial field assigned to you. A window will pop up asking you to confirm your name and initials. Check that they are correct, and then click the blue "ADOPT AND SIGN" button. This action creates your electronic signature for this session.
-
Complete All Fields: After adopting your signature, Dotloop will guide you through the rest of the document. It will automatically jump to the next required field. Simply click on each signature, initial, or text box to apply your information. If you need to fill in a date or text, you can type directly into the field.
-
Finish Signing: This is the most important step. Once you have filled in all the required fields, a blue button in the top-right corner will now say "FINISH SIGNING." You must click this button. If you close the window without clicking it, your signatures will not be saved, and the document will remain incomplete.
-
Confirmation: After clicking "Finish Signing," you'll be asked if you want to create a free Dotloop account to save and manage your documents. This is completely optional. You can simply close the window. Your agent will be automatically notified that you've signed, and you will receive an email with a PDF copy of the signed documents for your records.
How to Sign Documents in Dotloop on Mobile (iPhone & Android)
The process for how to sign documents in dotloop on a mobile device is very similar to the desktop experience, with a few minor differences in the user interface.
-
Open the Email on Your Phone: Access your email on your smartphone or tablet and open the signing request from Dotloop.
-
Tap 'View Document': Tap the blue "VIEW DOCUMENT" button. The document will open in your phone's web browser.
-
Tap 'Start Signing': Just like on desktop, a "START SIGNING" button will appear. Tap it to begin.
-
Adopt and Sign: The document will scroll to the first field. Tap the signature box. You will be prompted to confirm and adopt your signature. Your name and initials will be pre-filled. Tap "ADOPT AND SIGN."
-
Navigate and Tap to Sign: The system will guide you to each required field. Tap each box to place your signature or initials. You can pinch to zoom in or out if you need to read the text more closely.
-
Tap 'Finish Signing': When all fields are complete, the "FINISH SIGNING" button will appear at the top of the screen. Tap it to finalize the document. You will receive the same confirmation and a copy of the signed documents via email.
How to Sign Your Own Documents as an Agent in Dotloop
If you're a real estate agent, you'll often need to sign documents yourself before or after sharing them with clients. The process is slightly different because you are already working within your Dotloop account.
-
Open the Document: Navigate to the loop and open the document you need to sign.
-
Assign Signature Fields to Yourself: Before you can sign, you must ensure the signature and initial fields are assigned to you. Click on a signature field. A menu will appear. Under "Assign to," select your name from the dropdown list. You can use the "Autofill" feature to assign roles (like "Buyer's Agent") to automatically assign all relevant fields to yourself.
-
Click 'Sign Now': Once a field is assigned to you, a "SIGN NOW" button will appear above the document toolbar. Click this button to initiate the signing process for your own fields.
-
Adopt Your Signature: If you haven't already, you'll be prompted to adopt your signature and initials. You can choose a font or draw your signature. Once adopted, this signature will be saved to your profile for future use.
-
Complete and Save: Dotloop will guide you through all fields assigned to you. After signing, be sure to click the "SAVE" button in the top-right corner to save your changes to the document. If you are sharing it immediately, you can click "SAVE AND SHARE."
Pro Tip: Set up your signature and initials in your Dotloop account settings ahead of time. This saves you the step of adopting it every time and ensures your signature is consistent across all documents.
Hosting an In-Person Signing Session with Dotloop
Sometimes, you may be with a client who needs to sign a document on your device, like a laptop or tablet. Dotloop has a specific feature for this called "Host In-Person Signing." This maintains the security and integrity of the signature process.
This method is ideal when a client is not comfortable with technology or doesn't have immediate access to their email. It allows you to guide them through the signing process while ensuring the signature is properly attributed to them.
-
Open the Document: From your Dotloop account, open the document that needs to be signed.
-
Select 'Host In-Person Signing': In the document toolbar at the top, click the "MORE" dropdown menu. Select "Host In-Person Signing" from the list of options.
-
Choose the Signer: A window will appear listing all the people in the loop. Select the name of the person who will be signing the document on your device.
-
Hand Over the Device: A disclaimer will appear, instructing you to hand control of the device to the person signing. This is an important step for compliance, as it confirms the client is the one performing the action. Click "CONTINUE" and then pass your laptop or tablet to the client.
-
Client Signs the Document: The client will now see the familiar signing interface. They will click "START SIGNING" and be guided through the document just as they would on their own device. They will adopt their signature and click on each field to sign.
-
Client Finishes and Returns Device: After they have completed all fields, they must click "FINISH SIGNING." A confirmation message will appear. At this point, they can hand the device back to you. The signature is now captured, time-stamped, and recorded in the audit trail as an in-person signing event.
Common Issues and Troubleshooting for Dotloop Document Signing

While the process is generally smooth, you or your clients might occasionally run into issues. Here are solutions to some of the most common problems.
I Didn't Receive the Signing Email
If a client says they never got the email, the first step is to have them check their spam or junk folder. Emails from Dotloop can sometimes be filtered by aggressive email clients. Also, confirm you sent it to the correct email address—a simple typo is a frequent cause. If it's still missing, you can reshare the document from within the loop, which sends a new email notification.
The 'Start Signing' Button Isn't Working
This can sometimes be a browser-related issue. The best first step is to try a different web browser (e.g., switch from Safari to Google Chrome) or clear the browser's cache and cookies. An outdated browser or certain browser extensions (like ad blockers) can sometimes interfere with the scripts on the page. Disabling extensions temporarily can often resolve the problem.
I Can't Edit My Name or Initials
When you receive a document to sign, your name and initials are pre-filled by the person who sent it (your agent). You cannot edit this information directly in the signing view. If your name is misspelled or incorrect, you must contact the agent and ask them to correct it and reshare the document. This is a security measure to ensure the person assigned to the signature field is the one signing.
I Finished Signing, But It's Still Showing as 'Waiting on Others'
This happens if you closed the browser tab without clicking the final "FINISH SIGNING" button. Even if you've clicked every signature field, the process isn't complete until you click that final button. Re-open the document from the original email link, and you should be able to click "FINISH SIGNING" to complete the process.
Dotloop Pricing: What Does It Cost?
For clients, signing documents in Dotloop is always free. You will never be asked to pay or enter credit card information to sign a document that has been shared with you.
For real estate professionals, Dotloop offers several pricing tiers:
- Dotloop Premium (for individual agents): This is the main paid plan for agents. It includes unlimited loops, eSignatures, a mobile app, secure document storage, and various integrations. It's designed as an all-in-one solution for a single agent to manage their transactions.
- Dotloop for Teams (Business+): For real estate teams, this plan includes all the features of Premium plus additional tools for collaboration and broker compliance. It offers enhanced reporting, custom branding, and features to help team leads manage their agents' transactions.
Pricing for these plans can change, so it's best to visit the official Dotloop website for the most current information. They typically charge on a monthly or annual subscription basis.
Pros and Cons of Using Dotloop for eSignatures
Dotloop is a powerful tool, but like any software, it has its strengths and weaknesses.
Pros
- All-in-One Platform: Its biggest advantage is that it's more than just an eSignature tool. It's a complete transaction management system built specifically for real estate.
- Ease of Use for Clients: The client-facing signing process is simple and requires no account or technical skill, reducing friction in the transaction.
- Strong Security and Compliance: With a detailed audit trail and robust encryption, it provides peace of mind that transactions are secure and legally sound.
- Excellent Collaboration: The "loop" concept makes it easy for all parties (agent, client, lender, etc.) to see and act on documents in one place.
Cons
- Learning Curve for Agents: While simple for clients, the agent side of the platform can have a learning curve due to its extensive features.
- Real Estate Specific: It is highly tailored to the real estate industry. Professionals in other fields might find it less suitable than more general eSignature platforms like DocuSign.
- Can Feel Rigid: The workflow is structured around real estate transactions, which might feel restrictive for non-standard deals or users who prefer more flexibility.
Frequently Asked Questions
Here are answers to some of the most common questions people have about the dotloop document signing process.
Is Dotloop the same as DocuSign?
No, they are not the same, though they serve a similar core function. DocuSign is a general-purpose electronic signature platform used across many industries, including finance, legal, and healthcare. Dotloop is a specialized platform built specifically for the real estate industry. While both offer legally binding eSignatures, Dotloop also includes features for transaction management, compliance, and collaboration tailored to real estate agents and brokers.
How do I sign a Dotloop document on my iPhone?
Signing on an iPhone is simple. Open the email you received from Dotloop in your Mail app. Tap the "VIEW DOCUMENT" button, which will open the document in your Safari browser. Tap "START SIGNING," and the page will guide you to each field.
Tap a signature field to open the adoption window, confirm your signature, and then tap each subsequent field to sign. When done, tap the "FINISH SIGNING" button at the top.
Why can't I sign into Dotloop?
As a client, you don't need to sign in. If you're trying to access a document, always use the link in the email request. If you are an agent and can't sign in, first try the "Forgot Password?" link on the login page. If that doesn't work, ensure you are using the correct email address associated with your account.
Sometimes clearing your browser cache or trying a different browser can also solve login issues.
Which documents cannot be electronically signed?
While the vast majority of documents can be signed electronically, a very small number of legal documents may still require a physical, wet-ink signature. According to the ESIGN Act, these can include wills and testamentary trusts, court orders, and official notices related to utility cancellation or foreclosure. However, for all standard real estate purchase agreements, disclosures, and contracts, electronic signatures are legally valid.
How do I know if my signature was submitted correctly?
You will receive two confirmations. First, after you click "FINISH SIGNING," a confirmation message will appear on the screen. Second, you will receive an email from Dotloop shortly after, confirming that you have signed the documents. This email will also include a PDF copy of the fully executed documents for your personal records.
Final Thoughts
Learning how to sign a Dotloop document is a simple skill that makes the complex process of a real estate transaction much smoother. The platform is designed to be intuitive for clients, guiding you from the initial email to the final click with clear, actionable prompts. By following the steps outlined in this guide, you can confidently and securely sign your documents from any device.
Remember, the most critical steps are to use the link in your email, follow the on-screen prompts, and always click the "FINISH SIGNING" button to save your work. If you run into any trouble, don't hesitate to reach out to your real estate agent, who can quickly reshare the document or help troubleshoot the issue.
With tools like Dotloop, the days of printing, scanning, and faxing are thankfully behind us, allowing everyone to focus on the more important aspects of the deal.