


How to Sign Dotloop Documents Fast: A Simple Guide for Clients & Agents
Receiving a request to sign a real estate document can feel daunting, especially when it's through an unfamiliar platform. If you've been asked to sign something in Dotloop, you're in the right place. Learning how to sign a Dotloop document is straightforward, and this guide will walk you through every step, whether you're a client signing a contract or an agent finalizing paperwork.
Dotloop is designed to make real estate transactions smoother and more secure. The process for signing Dotloop documents is intuitive, but knowing exactly what to expect can eliminate any confusion and help you complete the task in minutes. We'll cover everything from opening the initial email to troubleshooting common issues, ensuring you can sign with confidence from your computer or mobile device.
Quick Summary
- The Signing Process is Guided: When you open a document, Dotloop uses a blinking blue or yellow button to guide you to each field that needs your signature or initials. You won't miss a spot.
- Adopt Your Signature: You don't need a pre-made digital signature. Dotloop allows you to adopt a signature by simply typing your name, which is legally binding, or by drawing it with your mouse or finger.
- Mobile-Friendly Signing: The process for dotloop document signing is nearly identical on a smartphone or tablet, allowing you to complete paperwork from anywhere.
- It's More Than Just a Signature: Dotloop provides a secure, verifiable audit trail for every action taken on a document, adding a layer of security and transparency to your transaction.
- Immediate Confirmation: Once you finish signing, the document is automatically saved and shared back with the sender. You'll receive a confirmation, and you can download a copy for your records.
What is Dotloop and Why Is It Used for Document Signing?
Dotloop is a comprehensive transaction management platform built specifically for the real estate industry. While its e-signature feature is what most clients interact with, it's important to understand that it does much more. Think of it as a central hub where real estate agents, brokers, clients, and other parties can collaborate on a transaction from start to finish.
At its core, Dotloop replaces the need for printing, faxing, and physically delivering stacks of paper. It allows agents to create, share, and manage all transaction-related documents in a single, secure online workspace called a "loop." When an agent sends you a document to sign, they are sharing it from within this loop. This integrated system ensures that everyone involved has access to the most up-to-date versions of contracts and disclosures.
The primary reason Dotloop is so popular for dotloop document signing is its combination of simplicity and legal compliance. Electronic signatures executed through platforms like Dotloop are legally binding under the U.S. Electronic Signatures in Global and National Commerce (ESIGN) Act and the Uniform Electronic Transactions Act (UETA). The platform ensures the integrity of the signature process with a detailed audit trail, tracking who signed, when they signed, and where (via IP address).
The Core Benefits of Signing Documents in Dotloop
Using a platform like Dotloop for signing documents offers significant advantages over traditional paper-based methods. These benefits enhance efficiency, security, and convenience for everyone involved in a real estate deal.
First and foremost is speed. The ability to sign documents electronically eliminates delays caused by printing, scanning, or mailing. A contract can be sent, signed, and returned in a matter of minutes, which is critical in fast-moving real estate markets where timing can make or break a deal.
Security is another major benefit. Dotloop provides bank-grade encryption to protect sensitive information contained in real estate documents. Every signature is certified with a unique ID, timestamp, and IP address. This creates a verifiable audit trail that is much more difficult to dispute than a simple pen-and-paper signature, offering protection for both the agent and the client.


Convenience is also a key factor. You can sign documents from anywhere in the world, on any device with an internet connection. This is incredibly helpful for out-of-state buyers, busy professionals, or anyone who prefers the ease of handling tasks digitally. The guided signing process ensures you don't accidentally miss a required signature or initial, preventing common errors that could delay a transaction.
Finally, the platform promotes better organization. All signed documents are stored securely in the cloud within the transaction's loop. This means you and your agent have easy access to every document, and you can download copies for your personal records at any time without sifting through a mountain of paperwor
k.
https://rankamigo.s3.us-east-1.amazoide for Clients
If you've received an email requesting your signature, the process is simple. Dotloop is designed to be user-friendly, guiding you through each step. Here’s a detailed breakdown of what to expect.
Step 1: Open the Email and Access the Document
You will receive an email from your agent via Dotloop. The subject line will typically say something like "ACTION NEEDED – [Your Agent's Name] has shared a document with you." Open this email.
Inside, you'll find a message from your agent and a large blue button that says VIEW DOCUMENT. Click this button. You do not need to have a Dotloop account to sign; this link provides you with direct, secure access to the documents requiring your signature.
Step 2: Start the Signing Process
After clicking the link, a new tab will open in your web browser displaying the document. At the top right corner of the screen, you will see a prominent, often blinking, blue button that says START SIGNING. Click this button.
Clicking this button doesn't sign anything for you. Instead, it acts as a navigation tool, automatically scrolling you to the first field that requires your attention. This ensures you don't have to manually hunt for every signature or initial box.
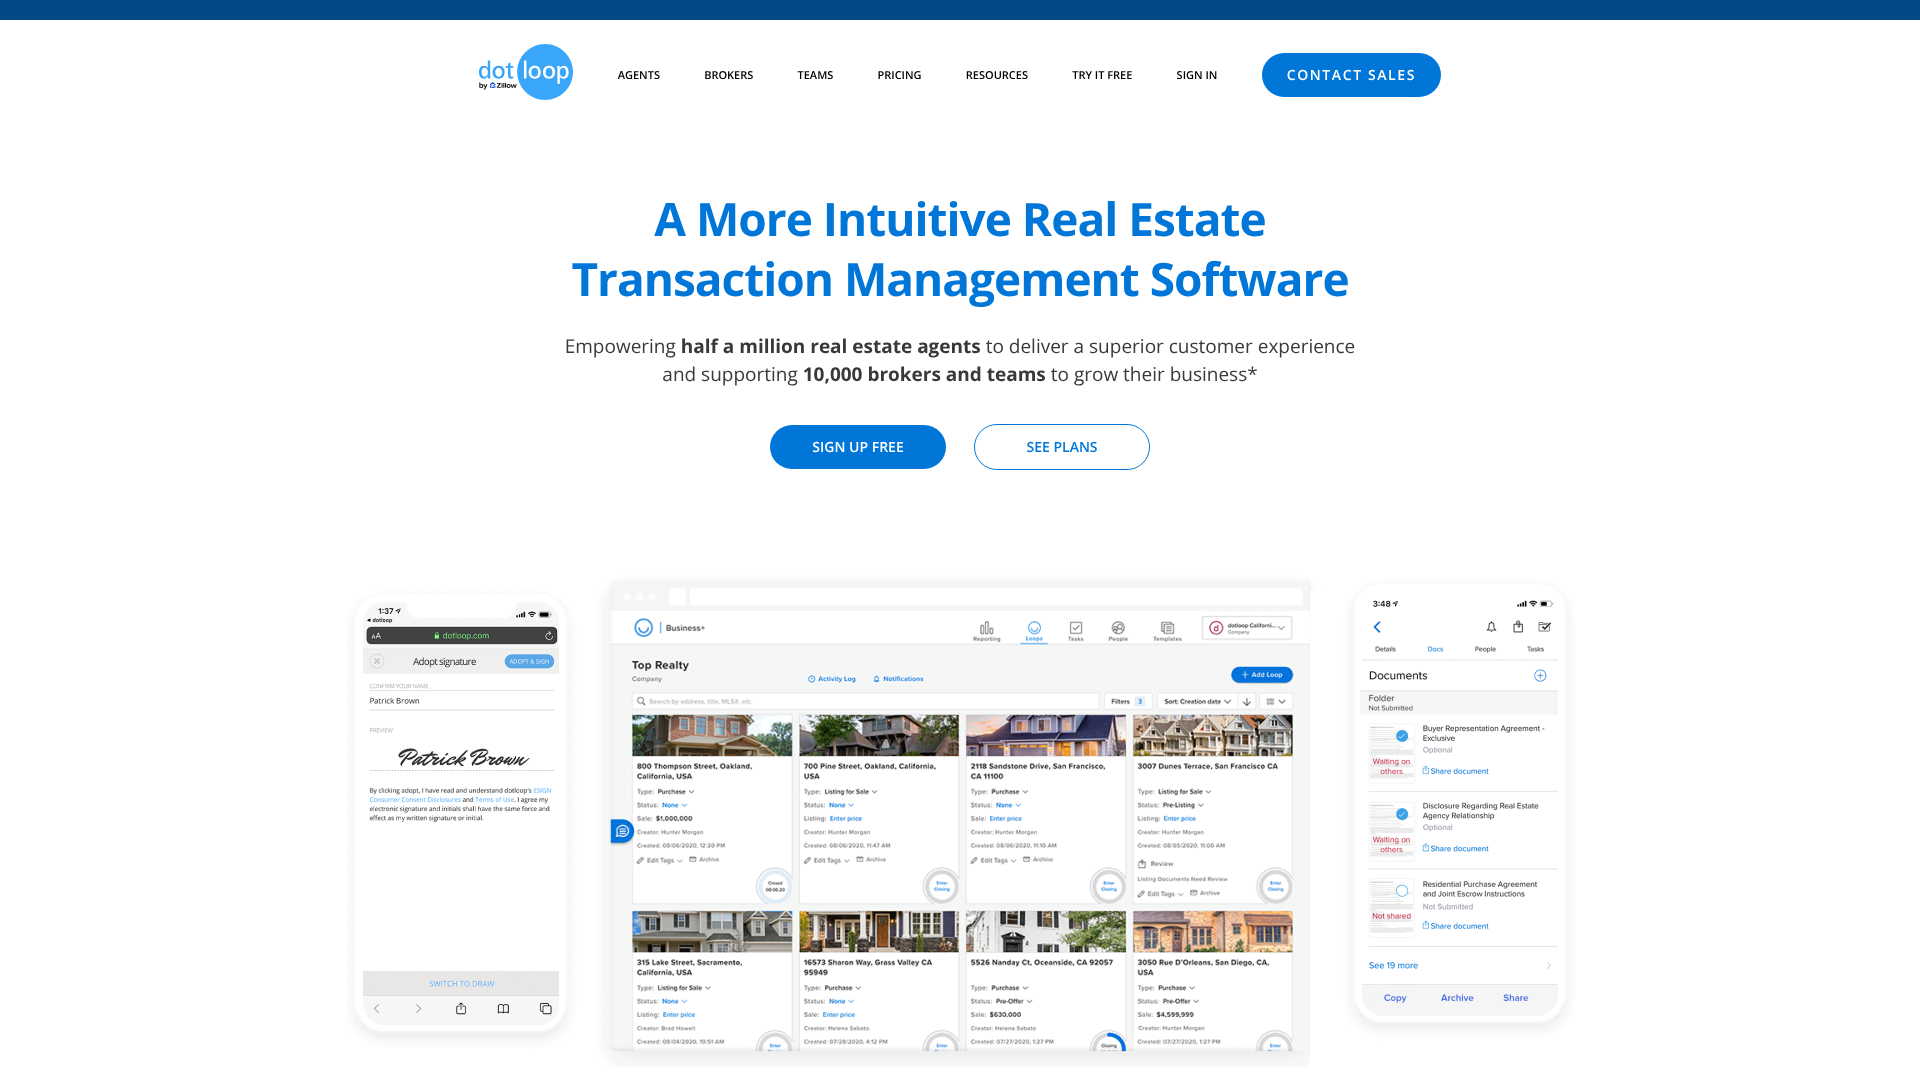
Step 3: Adopt Your Signature
When you are taken to the first signature or initial field, click on the yellow box. A pop-up window titled "Adopt Your Signature" will appear. This is where you confirm how your signature and initials will look on the document.
You have two main options:
- Typed Signature (Default” alt=”how to sign dotloop document” />: Dotloop will automatically generate a signature and initials for you based on the name your agent entered. This is the most common and is fully legally binding. If you're happy with it, simply click the blue ADOPT AND SIGN button.
- Drawn Signature: If you prefer to draw your signature, you can click the "Draw Signature" link in the bottom-left of the pop-up. This will give you a blank canvas where you can use your mouse (or your finger on a touchscreen device) to draw your signature. Once finished, click ADOPT AND SIGN.
Once you adopt your signature, Dotloop will remember your choice for all other fields in that document set.
Step 4: Complete All Required Fields
After adopting your signature, Dotloop will automatically apply it to the first field. The system will then immediately guide you to the next required field, which will be highlighted.
Continue clicking on each highlighted signature, initial, or text box. As you click each one, your adopted signature or initials will be applied. If it's a text box for a date or other information, you can type directly into it. The START SIGNING button at the top will now show your progress (e.g., "1 of 5 SIGNED").
Step 5: Finish and Submit Your Signed Document
Once you have completed all the required fields, the button in the top-right corner will turn green and say FINISH SIGNING. Click this button to finalize the process.
A confirmation message will appear, letting you know you're all done. At this point, the document is automatically saved and shared back with the person who sent it. You will also typically be given the option to create a free Dotloop account to store your documents or to download a PDF copy for your records.
Pro Tip: Always download a copy of the signed documents for your personal files. While Dotloop stores them securely, having your own backup is a smart practice. You'll usually receive a final email with a PDF attachment or a link to download it once all parties have signed.
How to Sign Your Own Documents as an Agent in Dotloop
For real estate agents, the process of how to sign documents in Dotloop that you've prepared is just as simple. Often, you'll need to sign disclosures or other documents alongside your client. The system recognizes you as a user with signing privileges within your own loops.
First, open the document you need to sign from within the loop. Navigate to the signature or initial field that has been assigned to you. Unlike the client experience, you won't see a large "START SIGNING" button unless you are the only one signing.
Simply click on the field assigned to you. If you have already set up your signature in your Dotloop account profile, it will be applied instantly. If you haven't, you'll be prompted to adopt your signature, just as a client would. You can confirm your typed name or choose to draw it.
Once adopted, your signature will be saved to your account for future use, making subsequent signings a one-click process.
After signing, remember to share the document with the other parties if you haven't already. The document status will update within the loop, showing that your signature is complete. This seamless workflow is a core part of what makes Dotloop an efficient tool for agents.
Signing Dotloop Documents on Mobile (iOS & Android)

The modern real estate transaction often happens on the go, and Dotloop's mobile experience is built for this reality. The process for signing Dotloop documents on a smartphone or tablet is nearly identical to the desktop experience, with only minor differences in the user interface to accommodate smaller screens.
Whether you're using an iPhone, iPad, or Android device, you'll start by tapping the VIEW DOCUMENT link in the email you received. The document will open in your device's web browser. From there, you'll see the familiar START SIGNING button at the top of the screen. Tap it to begin.
The system will guide you to each required field. Tap on the signature or initial box, and the "Adopt Your Signature" window will appear. Here, you can accept the typed version or tap "Draw Signature" to sign with your finger or a stylus. Many people find drawing a signature more natural on a touchscreen.
After you adopt it, you'll continue tapping each field until you're done. Finally, tap the FINISH SIGNING button to complete the process.
In-Person Signing: How to Sign Documents in Dotloop with Clients Present
What if your client is with you in your office and you need to sign documents right then and there? Dotloop has a feature specifically for this scenario called "In-Person Signing." This allows you to hand your laptop or tablet to your client so they can sign without needing to access their own email.
To initiate an in-person signing session, open the document from your Dotloop account. In the top right corner, instead of clicking "Sign Now," you'll see a menu (often represented by three dots or an arrow). From this menu, select the In-Person Sign option.
Dotloop will then prepare the document for a hosted signing session. The screen will prompt you to hand the device over to the signer. The client will see a clear, guided interface similar to the remote signing experience. They will be asked to confirm their identity, adopt a signature, and then they will be guided through each required field.
Once they click FINISH SIGNING, the device can be handed back to you. This feature is secure, compliant, and captures the necessary legal evidence just like a remote signature.
Understanding Dotloop's Security and Verification Features
When dealing with legally binding contracts worth hundreds of thousands of dollars, security is paramount. Dotloop incorporates several layers of protection to ensure the integrity of every document and signature.
First, all data is protected with AES 256-bit encryption, the same level of security used by banks. This protects documents both in transit and at rest on Dotloop's servers. The platform is also SOC 2 Type II certified, which is a rigorous auditing procedure that ensures a company securely manages data to protect the interests and privacy of its clients.
For signatures specifically, Dotloop creates a detailed Signature Verification certificate for every signed document. This certificate acts as a comprehensive audit trail. You can access it by clicking the dropdown menu next to a document's name in the loop and selecting "Signature Verification." This report includes:
- A unique ID for each signature.
- The name and email of the signer.
- The exact time and date of the signature.
- The IP address from which the document was signed.
This detailed record provides strong, legally admissible evidence of the signing event, offering peace of mind and protection for all parties involved in the transaction.
Dotloop Pricing: What Does It Cost?
For clients signing documents, Dotloop is completely free. You never need to pay or create an account to sign something shared with you. The cost of the service is covered by the real estate professionals who use it to manage their transactions.
For real estate agents and brokers, Dotloop offers several pricing tiers. As of 2026, the plans are structured as follows:
- Dotloop Premium (for Agents): This is the most common plan for individual agents. It typically costs around $30-$40 per month. It includes unlimited transactions (loops), e-signatures, document templates, and integrations with services like Zillow and Trulia.
- Dotloop for Teams: Designed for real estate teams, this plan adds features for collaboration and broker compliance oversight. Pricing is customized based on the number of users.
- Dotloop Business+ (for Brokers): This is the brokerage-level solution. It includes advanced compliance management, reporting dashboards, and customized branding. Pricing is tailored to the size and needs of the brokerage.
It's important to note that pricing can change, and promotions are often available. For the most current information, it's best to visit the official Dotloop website.
Pros and Cons of Dotloop for Document Signing
Like any software, Dotloop has its strengths and weaknesses. Understanding them can provide a clearer picture of its role in the real estate ecosystem.
Pros
- All-in-One Platform: Dotloop is more than just an e-signature tool. It manages the entire transaction, from offer to close, keeping everything organized in one place.
- User-Friendly Interface: The guided signing process is intuitive for clients who may not be tech-savvy, reducing errors and support requests for agents.
- Strong Audit Trail: The detailed verification certificates provide excellent security and legal backing for all signed documents.
- Real Estate Specific: The platform is built from the ground up for real estate, with features and templates tailored to the industry's unique needs.
Cons
- Cost for Agents: While free for clients, the subscription cost for agents can be a consideration, especially for those new to the industry.
- Mobile App Limitations: While functional for signing, some agents find the mobile app less powerful than the desktop version for complex tasks like document editing or loop setup.
- Learning Curve for Advanced Features: While signing is easy, agents may need some time to master all the advanced transaction management and compliance features the platform offers.
Troubleshooting Common Dotloop Signing Issues
While the signing process is generally smooth, a few common hiccups can occur. Here’s how to solve them.
- I didn't receive the email: First, check your spam or junk folder. Emails from Dotloop can sometimes be filtered by mistake. If it's not there, confirm with your agent that they used the correct email address. A simple typo is often the culprit.
- The "Start Signing" button isn't working: This can sometimes be caused by a browser issue. Try refreshing the page. If that doesn't work, try opening the link in a different web browser (e.g., switch from Chrome to Firefox) or in an incognito/private browsing window.
- I made a mistake and need to fix it: If you haven't clicked "Finish Signing" yet, you can typically click back on a field to change it. If you have already finished, you cannot edit the document yourself. You must contact the agent who sent it. They can reset the document and resend it to you for correction.
- I can't log into my Dotloop account: If you're a client, remember you don't need an account to sign. If you're an agent having trouble, use the "Forgot Password" link on the login page to reset your credentials. Ensure you're using the email address associated with your Dotloop account.
Frequently Asked Questions
How do I sign a document on dotloop?
To sign a document, open the email you received and click the "View Document" button. Once the document loads, click the "Start Signing" button in the top right. This will guide you to the first field. Click the field, adopt your signature by typing or drawing your name, and then continue clicking on each required field until you're done.
Finally, click "Finish Signing.".
How to do in person signing on dotloop?
In-person signing is a feature for agents. From their account, the agent opens the document, selects "In-Person Sign" from the menu, and then hands the device (laptop or tablet) to the client. The client is then guided through the signing process on the agent's device without needing to access their own email.
Are DocuSign and dotloop the same?
No, they are not the same, though they have overlapping features. DocuSign is primarily an e-signature company that serves many industries. Dotloop is a complete real estate transaction management platform built specifically for agents and brokers, which includes e-signatures as one of its core features. Many agents prefer Dotloop because it integrates document signing with all other aspects of managing a deal.
How to make a document fillable in dotloop?
This is a function for the agent or document creator. To make a PDF fillable, an agent uploads it into a loop. Then, they use Dotloop's document editor to drag and drop signature, initial, text, and date fields onto the document. They assign each field to a specific person (e.g., Buyer 1, Seller 1) before sharing it for signatures.
Can I just type my name for an electronic signature?
Yes. Under the ESIGN Act in the United States, a typed name, when intended to be a signature, is a valid and legally binding electronic signature. When you click "Adopt and Sign" in Dotloop, you are creating a legal signature and demonstrating your intent to be bound by the terms of the document.
Final Thoughts
Learning how to sign a Dotloop document is a simple skill that makes the complex process of a real estate transaction significantly easier. The platform's guided workflow, robust security, and mobile accessibility are designed to remove friction and keep deals moving forward. Whether you're a first-time homebuyer or a seasoned agent, the process is built to be intuitive and efficient.
By following the steps outlined in this guide, you can handle any signature request with confidence and ease. The era of printing, signing, and scanning stacks of paper is over, and platforms like Dotloop are leading the way toward a more streamlined and secure future for real estate. Now you're ready to complete your next signing in just a few clicks.